BIOS-Einstellungen
HINWEIS: Die BIOS-Abbildungen sind nur als Referenz gedacht. Die tatsächlichen
Anzeigen können nach Modell und Region von den Abbildungen abweichen.
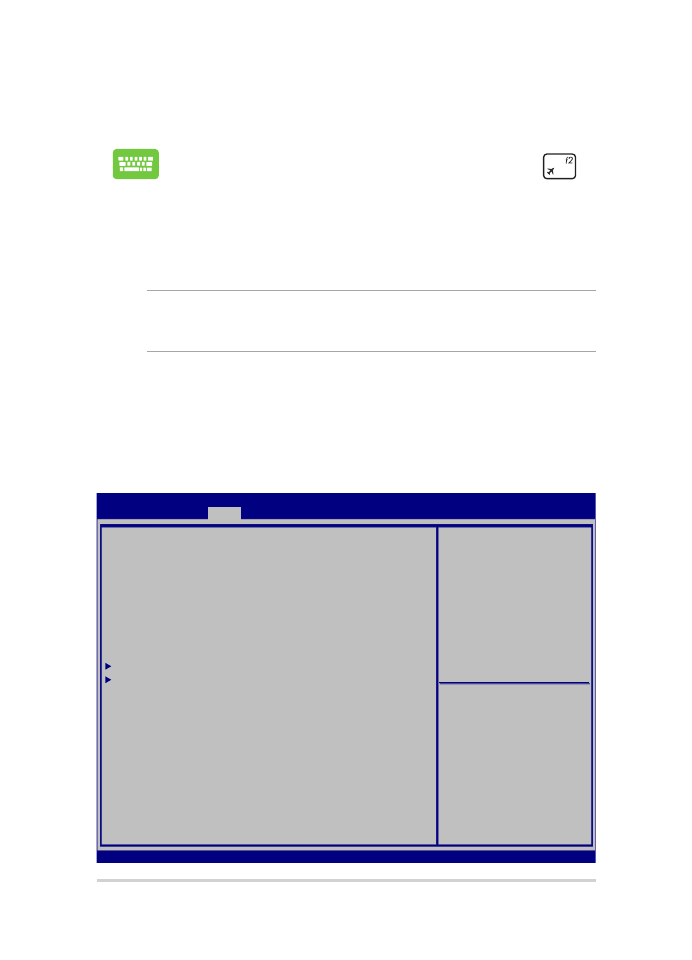
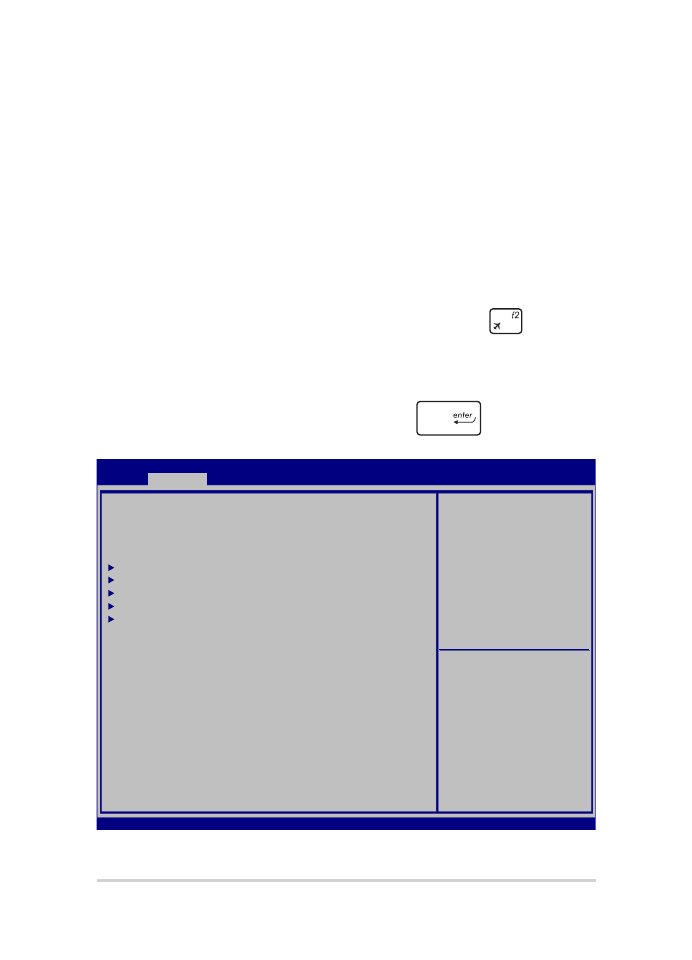
Boot
Dieses Menü ermöglicht Ihnen die Einstellung Ihrer Boot-Prioritäten.
Beachten Sie beim Einstellen Ihrer Boot-Priorität folgende Verfahren.
1.
Wählen Sie im Boot-Menü Boot Option #1.
BIOS aufrufen
Starten Sie Ihren Notebook-PC neu, drücken Sie dann
während POST.
Aptio Setup Utility - Copyright (C) 2015 American Megatrends, Inc.
Main Advanced
Boot
Security Save & Exit
Version 2.16.1243 Copyright (C) 2015 American Megatrends, Inc.
Boot Configuration
Fast Boot [Enabled]
Launch CSM [Disabled]
Driver Option Priorities
Boot Option Priorities
Boot Option #1 [Windows Boot Manager]
Add New Boot Option
Delete Boot Option
Sets the system boot
order
→
← : Select Screen
↑↓ : Select Item
Enter: Select
+/— : Change Opt.
F1 : General Help
F9 : Optimized Defaults
F10 : Save & Exit
ESC : Exit
Notebook PC E-Handbuch
61
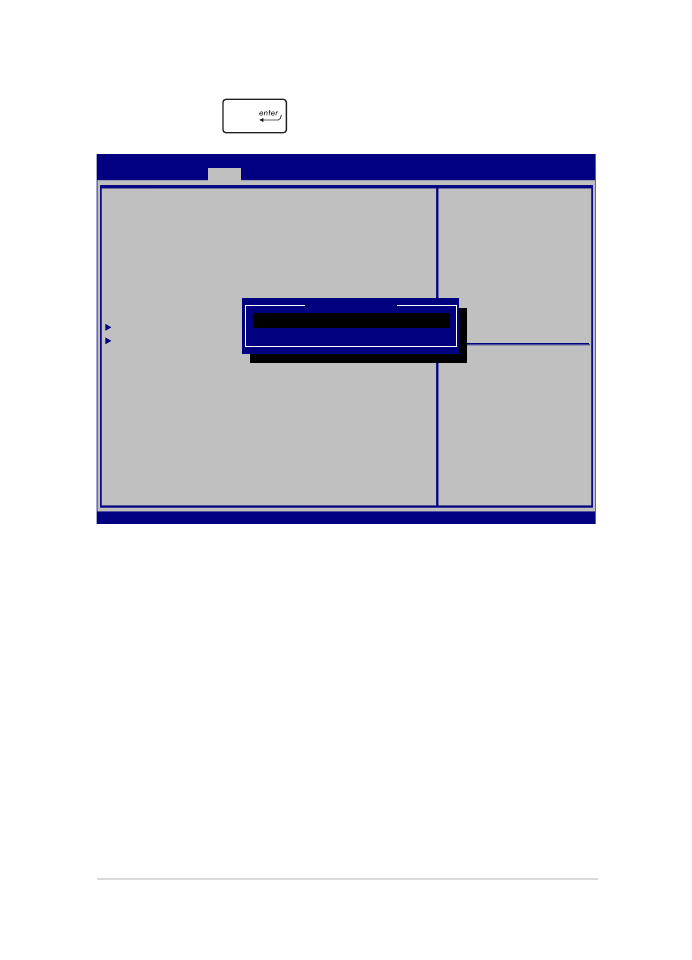
2.
Drücken Sie
und legen Sie ein Gerät als Boot Option #1 fest.
Aptio Setup Utility - Copyright (C) 2015 American Megatrends, Inc.
Main Advanced
Boot
Security Save & Exit
Version 2.16.1243 Copyright (C) 2015 American Megatrends, Inc.
Boot Configuration
Fast Boot [Enabled]
Launch CSM [Disabled]
Driver Option Priorities
Boot Option Priorities
Boot Option #1 [Windows Boot Manager]
Add New Boot Option
Delete Boot Option
Sets the system boot
order
→
← : Select Screen
↑↓ : Select Item
Enter: Select
+/— : Change Opt.
F1 : General Help
F9 : Optimized Defaults
F10 : Save & Exit
ESC : Exit
Boot Option #1
Windows Boot Manager
Disabled

62
Notebook PC E-Handbuch
Sicherheit
Dieses Menü ermöglicht Ihnen die Einrichtung von Administrator- und
Benutzerkennwort Ihres Notebook-PCs. Es ermöglicht Ihnen außerdem die
Zugriffssteuerung auf die Festplatte, Eingangs-/Ausgangsschnittstelle (E/A)
und USB-Schnittstelle Ihres Notebook-PCs.
HINWEIS:
•
Falls Sie ein User Password (Benutzerkennwort) einrichten,
werden Sie vor Aufrufen des Betriebssystems Ihres Notebook-PCs zur
Kennworteingabe aufgefordert.
•
Wenn Sie ein Administrator Password (Administratorkennwort) einrichten,
werden Sie vor Aufrufen des BIOS zur Kennworteingabe aufgefordert.
Aptio Setup Utility - Copyright (C) 2015 American Megatrends, Inc.
Main Advanced Boot
Security
Save & Exit
Version 2.16.1243 Copyright (C) 2015 American Megatrends, Inc.
Password Description
If ONLY the Administrator’s password is set, then
this only limits access to Setup and is only asked
for when entering Setup. If ONLY the user’s password
is set, then this is a power on password and must be
entered to boot or enter Setup. In Setup, the User
will have Administrator rights.
Administrator Password Status NOT INSTALLED
User Password Status NOT INSTALLED
Administrator Password
User Password
HDD Password Status : NOT INSTALLED
Set Master Password
Set User Password
I/O Interface Security
System Mode state User
Secure Boot state Enabled
Secure Boot Control [Enabled]
Key Management
Set Administrator
Password. The password
length must be in the
following range:
Minimum length 3
Maximum length 20
Must type with character:
a-z, 0-9
→
← : Select Screen
↑↓ : Select Item
Enter: Select
+/— : Change Opt.
F1 : General Help
F9 : Optimized Defaults
F10 : Save & Exit
ESC : Exit

Notebook PC E-Handbuch
63
So stellen Sie das Passwort ein:
1.
Wählen Sie im Security-Menü Administrator Password oder User
Password.
2.
Geben Sie ein Passwort ein und drücken Sie auf
.
3.
Geben Sie das Passwort erneut ein und drücken Sie
.
So löschen Sie das Passwort:
1.
Wählen Sie im Security-Menü Administrator Password oder User
Password.
2.
Geben Sie das derzeitige Passwort ein und drücken Sie auf
.
3.
Lassen Sie das Feld Create New Password frei und drücken Sie
.
4.
Wählen Sie im Bestätigungsfeld Yes (Ja), drücken Sie dann
.
64
Notebook PC E-Handbuch
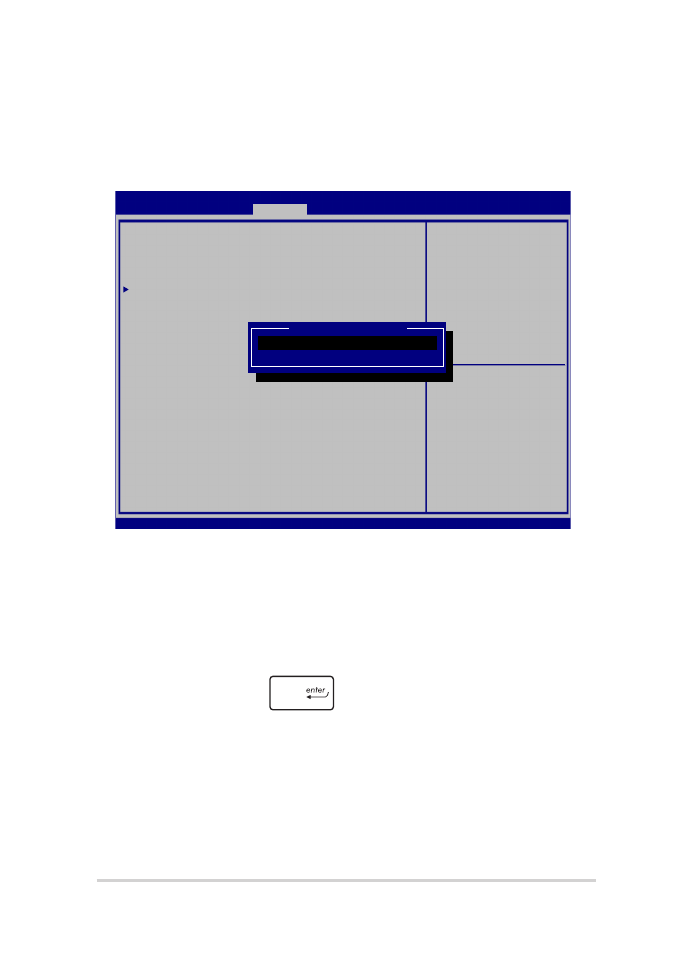
I/O Interface Security (E/A-Schnittstellensicherheit)
Im Sicherheitsmenü können Sie auf Sicherheitseinstellungen
der E/A-Schnittstelle zum Sperren oder Freigeben einiger
Schnittstellenfunktionen Ihres Notebook-PCs zugreifen.
So sperren Sie die E/A-Schnittstelle:
1.
Wählen Sie im Fenster Security das Element I/O Interface
Security.
2.
Wählen Sie eine Schnittstelle, die Sie sperren möchten, und
anschließend
.
3.
Wählen Sie Lock (Sperren).
Aptio Setup Utility - Copyright (C) 2015 American Megatrends, Inc.
Main Advanced Boot
Security
Save & Exit
Version 2.16.1243 Copyright (C) 2015 American Megatrends, Inc.
I/O Interface Security
LAN Network Interface [UnLock]
Wireless Network Interface [UnLock]
HD AUDIO Interface [UnLock]
USB Interface Security
If Locked, LAN controller
will be disabled.
→
← : Select Screen
↑↓ : Select Item
Enter: Select
+/— : Change Opt.
F1 : General Help
F9 : Optimized Defaults
F10 : Save & Exit
ESC : Exit
LAN Network interface
Lock
UnLock
Notebook PC E-Handbuch
65
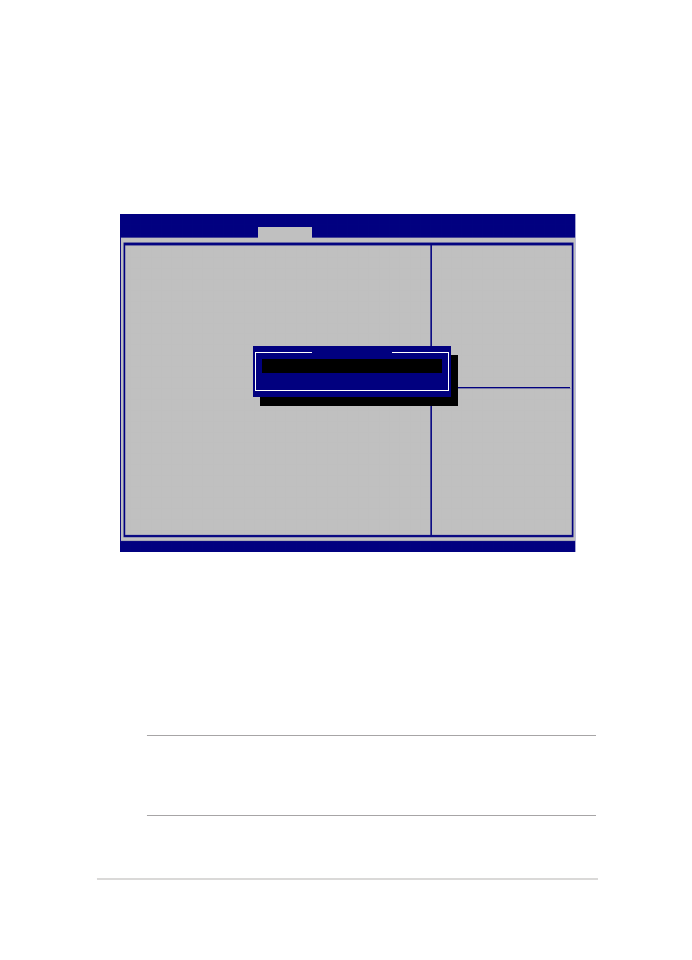
USB Interface Security (USB-Schnittstelle)
Über das I/O Interface Security (E/A-Schnittstellensicherheit)-
Menü können Sie außerdem auf Sicherheitseinstellungen der USB-
Schnittstelle zum Sperren oder Freigeben von Ports und Geräten
zugreifen.
So sperren Sie die USB-Schnittstelle:
1.
Wählen Sie im Fenster Security die Elemente I/O Interface
Security > USB Interface Security.
2.
Wählen Sie die zu sperrende Schnittstelle und klicken Sie auf
Lock.
HINWEIS: Beim Einstellen von USB-Schnittstelle auf Sperren auch Externe
Ports und andere Geräte unter USB-Schnittstellensicherheit gesperrt und
ausgeblendet.
Aptio Setup Utility - Copyright (C) 2015 American Megatrends, Inc.
Main Advanced Boot
Security
Save & Exit
Version 2.16.1243 Copyright (C) 2015 American Megatrends, Inc.
USB Interface Security
USB Interface [UnLock]
External Ports [UnLock]
CMOS Camera [UnLock]
Card Reader [UnLock]
If Locked, all USB device
will be disabled
→
← : Select Screen
↑↓ : Select Item
Enter: Select
+/— : Change Opt.
F1 : General Help
F9 : Optimized Defaults
F10 : Save & Exit
ESC : Exit
USB interface
Lock
UnLock

66
Notebook PC E-Handbuch
Set Master Password (Master-Kennwort festlegen)
Im Sicherheitsmenü können Sie mit Set Master Password (Master-
Kennwort festlegen) einen Kennwortzugriff auf Ihre Festplatte einrichten.
So erstellen Sie ein Festplattenkennwort:
1.
Klicken Sie im Fenster Security auf das Element Set Master
Password.
2.
Geben Sie ein Passwort ein und drücken Sie auf
.
3.
Geben Sie das Passwort erneut ein und drücken Sie
.
4.
Klicken Sie auf Set User Password und wiederholen Sie den
Vorgang zur Erstellung eines Benutzerkennwortes (User Password).
Aptio Setup Utility - Copyright (C) 2015 American Megatrends, Inc.
Main Advanced Boot
Security
Save & Exit
Version 2.16.1243 Copyright (C) 2015 American Megatrends, Inc.
Password Description
If ONLY the Administrator’s password is set, then
this only limits access to Setup and is only asked
for when entering Setup. If ONLY the user’s password
is set, then this is a power on password and must be
entered to boot or enter Setup. In Setup, the User
will have Administrator rights.
Administrator Password Status NOT INSTALLED
User Password Status NOT INSTALLED
Administrator Password
User Password
HDD Password Status : NOT INSTALLED
Set Master Password
Set User Password
I/O Interface Security
Set HDD Master Password.
***Advisable to
Power Cycle System
after Setting Hard
Disk Passwords***
→
← : Select Screen
↑↓ : Select Item
Enter: Select
+/— : Change Opt.
F1 : General Help
F9 : Optimized Defaults
F10 : Save & Exit
ESC : Exit

Notebook PC E-Handbuch
67
Save and Exit (Speichern und verlassen)
Wählen Sie zum Beibehalten Ihrer Konfigurationseinstellungen vor Verlassen
des BIOS Save Changes and Exit (Änderungen speichern und verlassen).
Aptio Setup Utility - Copyright (C) 2015 American Megatrends, Inc.
Main Advanced Boot Security
Save & Exit
Version 2.16.1243 Copyright (C) 2015 American Megatrends, Inc.
Save Changes and Exit
Discard Changes and Exit
Save Options
Save Changes
Discard Changes
Restore Defaults
Boot Override
Windows Boot Manager
Launch EFI Shell from filesystem device
Exit system setup after
saving the changes.
→
← : Select Screen
↑↓ : Select Item
Enter: Select
+/— : Change Opt.
F1 : General Help
F9 : Optimized Defaults
F10 : Save & Exit
ESC : Exit
68
Notebook PC E-Handbuch
Aktualisieren des BIOS:
1.
Prüfen Sie die exakte Modellnummer des Notebook-PCs, laden Sie
dann die aktuellste BIOS-Datei für Ihr Modell von der ASUS-Webseite
herunter.
2.
Speichern Sie eine Kopie der heruntergeladenen BIOS-Datei auf einem
Flash-Laufwerk.
3.
Verbinden Sie Ihr Flashlaufwerk mit Ihrem Notebook-PC.
4.
Starten Sie Ihren Notebook-PC neu, drücken Sie dann
während
POST.
5.
Benutzen Sie die Funktion Start Easy Flash im Bereich Advanced des
BIOS-Setup-Programms, dann drücken Sie
.
Aptio Setup Utility - Copyright (C) 2015 American Megatrends, Inc.
Main
Advanced
Boot Security Save & Exit
Version 2.16.1243 Copyright (C) 2015 American Megatrends, Inc.
Start Easy Flash
Internal Pointing Device [Enabled]
Wake on Lid Open [Enabled]
Power Off Energy Saving [Enabled]
SATA Configuration
Graphics Configuration
Intel (R) Anti-Theft Technology Corporation
USB Configuration
Network Stack
Press Enter to run the
utility to select and
update BIOS.
→
← : Select Screen
↑↓ : Select Item
Enter: Select
+/— : Change Opt.
F1 : General Help
F9 : Optimized Defaults
F10 : Save & Exit
ESC : Exit

Notebook PC E-Handbuch
69
6.
Suchen Sie die heruntergeladene BIOS-Datei im Flash-Laufwerk,
drücken Sie dann
.
7.
Sie müssen Restore Defaults auf der Seite Exit wählen, nachdem das
BIOS aktualisiert wurde.
FSO
FS1
FS2
FS3
FS4
0 EFI
<DIR>
[←→] : Switch [↑↓] : Choose [q] : Exit [Enter] : Enter/Execute
Current BIOS
Platform : GL502
Version : 101
Build Date : Oct 26 2015
Build Time : 11:51:05
New BIOS
FLASH TYPE : Generic Flash Type
ASUSTek EasyFlash Utility
Platform : Unknown
Version : Unknown
Build Date : Unknown
Build Time : Unknown

70
Notebook PC E-Handbuch