BIOS Settings
NOTE: The BIOS screens in this section are for reference only. The actual
screens may differ by model and territory.
Boot
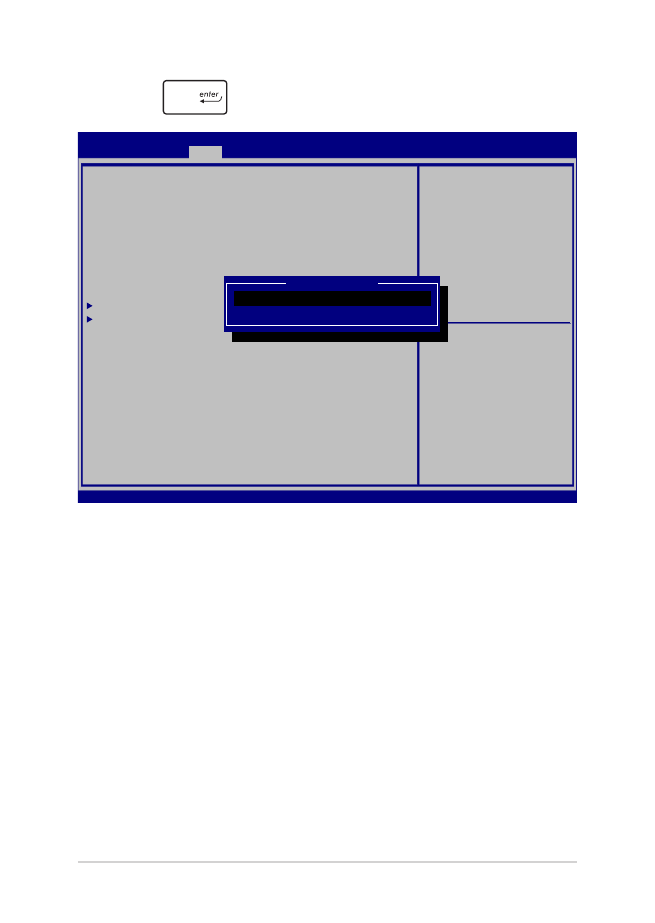
This menu allows you to set your boot option priorities. You may refer to
the following procedures when setting your boot priority.
1.
On the Boot screen, select Boot Option #1.
Aptio Setup Utility - Copyright (C) 2015 American Megatrends, Inc.
Main Advanced
Boot
Security Save & Exit
Version 2.16.1243 Copyright (C) 2015 American Megatrends, Inc.
Boot Configuration
Fast Boot [Enabled]
Launch CSM [Disabled]
Driver Option Priorities
Boot Option Priorities
Boot Option #1 [Windows Boot Manager]
Add New Boot Option
Delete Boot Option
Sets the system boot
order
→
← : Select Screen
↑↓ : Select Item
Enter: Select
+/— : Change Opt.
F1 : General Help
F9 : Optimized Defaults
F10 : Save & Exit
ESC : Exit

62
Notebook PC E-Manual
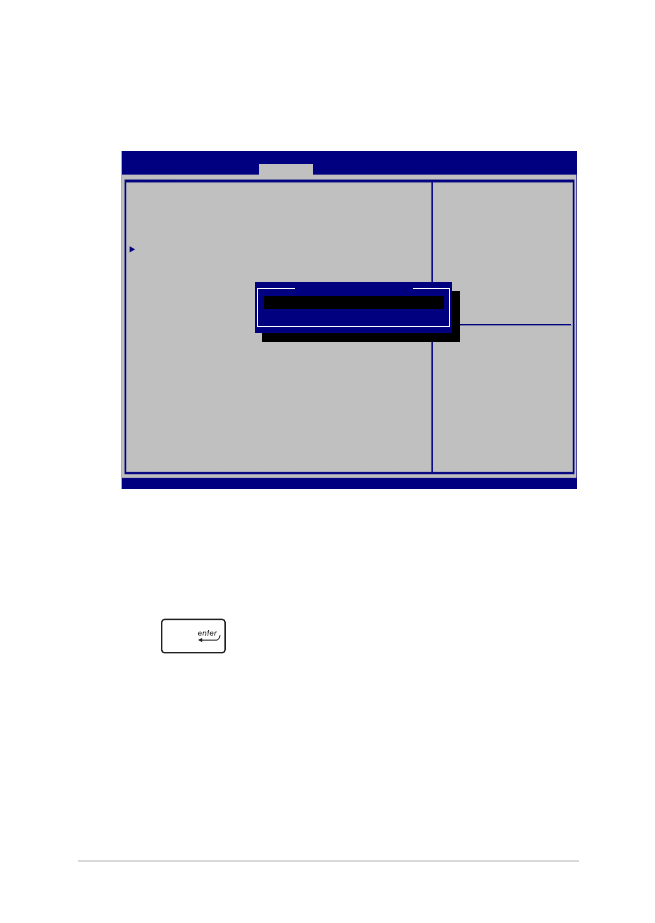
2. Press
and select a device as the Boot Option #1.
Aptio Setup Utility - Copyright (C) 2015 American Megatrends, Inc.
Main Advanced
Boot
Security Save & Exit
Version 2.16.1243 Copyright (C) 2015 American Megatrends, Inc.
Boot Configuration
Fast Boot [Enabled]
Launch CSM [Disabled]
Driver Option Priorities
Boot Option Priorities
Boot Option #1 [Windows Boot Manager]
Add New Boot Option
Delete Boot Option
Sets the system boot
order
→
← : Select Screen
↑↓ : Select Item
Enter: Select
+/— : Change Opt.
F1 : General Help
F9 : Optimized Defaults
F10 : Save & Exit
ESC : Exit
Boot Option #1
Windows Boot Manager
Disabled

Notebook PC E-Manual
63
Security
This menu allows you to set up the administrator and user password
of your Notebook PC. It also allows you to control the access to your
Notebook PC’s hard disk drive, input/output (I/O) interface, and USB
interface.
NOTE:
•
If you install a User Password, you will be prompted to input this
before entering your Notebook PC's operating system.
•
If you install an Administrator Password, you will be prompted to
input this before entering BIOS.
Aptio Setup Utility - Copyright (C) 2015 American Megatrends, Inc.
Main Advanced Boot
Security
Save & Exit
Version 2.16.1243 Copyright (C) 2015 American Megatrends, Inc.
Password Description
If ONLY the Administrator’s password is set, then
this only limits access to Setup and is only asked
for when entering Setup. If ONLY the user’s password
is set, then this is a power on password and must be
entered to boot or enter Setup. In Setup, the User
will have Administrator rights.
Administrator Password Status NOT INSTALLED
User Password Status NOT INSTALLED
Administrator Password
User Password
HDD Password Status : NOT INSTALLED
Set Master Password
Set User Password
I/O Interface Security
System Mode state User
Secure Boot state Enabled
Secure Boot Control [Enabled]
Key Management
Set Administrator
Password. The password
length must be in the
following range:
Minimum length 3
Maximum length 20
Must type with character:
a-z, 0-9
→
← : Select Screen
↑↓ : Select Item
Enter: Select
+/— : Change Opt.
F1 : General Help
F9 : Optimized Defaults
F10 : Save & Exit
ESC : Exit

64
Notebook PC E-Manual
To set the password:
1.
On the Security screen, select Administrator Password or User
Password.
2.
Type in a password then press
.
3.
Re-type to confirm the password then press
.
To clear the password:
1.
On the Security screen, select Administrator Password or User
Password.
2.
Type in the current password then press
.
3.
Leave the Create New Password field blank then press
.
4. Select
Yes in the confirmation box then press
.

Notebook PC E-Manual
65
I/O Interface Security
In the Security menu, you can access I/O Interface Security to lock
or unlock some interface functions of your Notebook PC.
To lock an interface:
1.
On the Security screen, select I/O Interface Security.
2.
Select an interface you would like to lock then press
.
3. Select
Lock.
Aptio Setup Utility - Copyright (C) 2015 American Megatrends, Inc.
Main Advanced Boot
Security
Save & Exit
Version 2.16.1243 Copyright (C) 2015 American Megatrends, Inc.
I/O Interface Security
LAN Network Interface [UnLock]
Wireless Network Interface [UnLock]
HD AUDIO Interface [UnLock]
USB Interface Security
If Locked, LAN controller
will be disabled.
→
← : Select Screen
↑↓ : Select Item
Enter: Select
+/— : Change Opt.
F1 : General Help
F9 : Optimized Defaults
F10 : Save & Exit
ESC : Exit
LAN Network interface
Lock
UnLock

66
Notebook PC E-Manual
USB Interface Security
Through the I/O Interface Security menu, you can also access USB
Interface Security to lock or unlock ports and devices.
To lock the USB interface:
1.
On the Security screen, select I/O Interface Security > USB
Interface Security.
2.
Select an interface that you would like to lock then select
Lock.
NOTE: Setting the USB Interface to Lock also locks and hides the
External Ports and other devices included under USB Interface Security.
Aptio Setup Utility - Copyright (C) 2015 American Megatrends, Inc.
Main Advanced Boot
Security
Save & Exit
Version 2.16.1243 Copyright (C) 2015 American Megatrends, Inc.
USB Interface Security
USB Interface [UnLock]
External Ports [UnLock]
CMOS Camera [UnLock]
Card Reader [UnLock]
If Locked, all USB device
will be disabled
→
← : Select Screen
↑↓ : Select Item
Enter: Select
+/— : Change Opt.
F1 : General Help
F9 : Optimized Defaults
F10 : Save & Exit
ESC : Exit
USB interface
Lock
UnLock

Notebook PC E-Manual
67
Set Master Password
In the Security menu, you can use Set Master Password to set up
a password-enabled access to your hard disk drive.
To set the HDD password:
1.
On the Security screen, select Set Master Password.
2.
Type in a password then press
.
3.
Re-type to confirm the password then press
.
4. Select
Set User Password then repeat the previous steps to
set up the user password.
Aptio Setup Utility - Copyright (C) 2015 American Megatrends, Inc.
Main Advanced Boot
Security
Save & Exit
Version 2.16.1243 Copyright (C) 2015 American Megatrends, Inc.
Password Description
If ONLY the Administrator’s password is set, then
this only limits access to Setup and is only asked
for when entering Setup. If ONLY the user’s password
is set, then this is a power on password and must be
entered to boot or enter Setup. In Setup, the User
will have Administrator rights.
Administrator Password Status NOT INSTALLED
User Password Status NOT INSTALLED
Administrator Password
User Password
HDD Password Status : NOT INSTALLED
Set Master Password
Set User Password
I/O Interface Security
Set HDD Master Password.
***Advisable to
Power Cycle System
after Setting Hard
Disk Passwords***
→
← : Select Screen
↑↓ : Select Item
Enter: Select
+/— : Change Opt.
F1 : General Help
F9 : Optimized Defaults
F10 : Save & Exit
ESC : Exit

68
Notebook PC E-Manual
Save & Exit
To keep your configuration settings, select Save Changes and Exit
before exiting the BIOS.
Aptio Setup Utility - Copyright (C) 2015 American Megatrends, Inc.
Main Advanced Boot Security
Save & Exit
Version 2.16.1243 Copyright (C) 2015 American Megatrends, Inc.
Save Changes and Exit
Discard Changes and Exit
Save Options
Save Changes
Discard Changes
Restore Defaults
Boot Override
Windows Boot Manager
Launch EFI Shell from filesystem device
Exit system setup after
saving the changes.
→
← : Select Screen
↑↓ : Select Item
Enter: Select
+/— : Change Opt.
F1 : General Help
F9 : Optimized Defaults
F10 : Save & Exit
ESC : Exit

Notebook PC E-Manual
69
To update the BIOS:
1.
Verify the Notebook PC’s exact model then download the latest
BIOS file for your model from the ASUS website.
2.
Save a copy of the downloaded BIOS file to a flash disk drive.
3.
Connect your flash disk drive to your Notebook PC.
4.
Restart your Notebook PC then press
during POST.
5.
From the BIOS menu, select Advanced > Start Easy Flash, then
press
.
Aptio Setup Utility - Copyright (C) 2015 American Megatrends, Inc.
Main
Advanced
Boot Security Save & Exit
Version 2.16.1243 Copyright (C) 2015 American Megatrends, Inc.
Start Easy Flash
Internal Pointing Device [Enabled]
Wake on Lid Open [Enabled]
Power Off Energy Saving [Enabled]
SATA Configuration
Graphics Configuration
Intel (R) Anti-Theft Technology Corporation
USB Configuration
Network Stack
Press Enter to run the
utility to select and
update BIOS.
→
← : Select Screen
↑↓ : Select Item
Enter: Select
+/— : Change Opt.
F1 : General Help
F9 : Optimized Defaults
F10 : Save & Exit
ESC : Exit

70
Notebook PC E-Manual
6.
Locate your downloaded BIOS file in the flash disk drive then
press
.
7.
After the BIOS update process, select Exit > Restore Defaults to
restore the system to its default settings.
FSO
FS1
FS2
FS3
FS4
0 EFI
<DIR>
[←→] : Switch [↑↓] : Choose [q] : Exit [Enter] : Enter/Execute
Current BIOS
Platform : GL502
Version : 101
Build Date : Oct 26 2015
Build Time : 11:51:05
New BIOS
FLASH TYPE : Generic Flash Type
ASUSTek EasyFlash Utility
Platform : Unknown
Version : Unknown
Build Date : Unknown
Build Time : Unknown

Notebook PC E-Manual
71